Automation
Connect AI assistants (MCP)
Connect an AI assistant to SoPasst safely, understand permissions, approve actions and revoke connections.
Overview
Connect an MCP-capable AI assistant to SoPasst. The assistant can then read your company's data, prepare drafts and propose actions such as issuing or recording a payment. Such an action is carried out only once you approve it in SoPasst.
Requirements
- Planet, Stern or Galaxie plan with an active subscription. The Komet plan does not include agent access: the confirmation page then shows “View plans” instead of “Connect securely”. If a connected company moves to Komet or its subscription ends, the assistant gets no tools any more and gives you the link to the subscription.
- You are the owner or an admin of the company. Tax adviser / bookkeeping members, employees and viewers cannot connect an assistant.
- Under Settings › Connect AI apps, “Connect AI apps” shows “Active”. That is the default. In Settings, the AI assistants & API tile leads there too.
- The address for every assistant is https://app.sopasst.at/api/mcp. You do not need a client ID or a password; sign-in runs through OAuth with your SoPasst account.
Connect Claude (web, desktop, app)
- In Claude, open “Customize › Connectors” and choose “Add custom connector”. In a Team or Enterprise account, the Owner adds the connector under “Organization settings › Connectors”; after that every member connects with “Connect”.
- Enter a name, for example SoPasst, and the address https://app.sopasst.at/api/mcp. Leave the advanced settings empty or choose “Use Claude's published identity”.
- Choose “Add” and then “Connect”. Claude opens SoPasst; continue under “Confirm the connection in SoPasst”.
Connect ChatGPT
- Turn on Developer mode in the ChatGPT settings. Depending on the version you find it under “Apps & Connectors” or “Apps” in the advanced settings; which ChatGPT plans have it is up to ChatGPT.
- Create your own connector or MCP server with the address https://app.sopasst.at/api/mcp and OAuth as the sign-in method.
- ChatGPT opens SoPasst; continue under “Confirm the connection in SoPasst”.
Connect Claude Code
- Enter in the terminal: claude mcp add --transport http sopasst https://app.sopasst.at/api/mcp
- Start Claude Code, type /mcp, choose “sopasst” and then “Authenticate”.
- Your browser opens SoPasst. The redirect destination shown there is localhost, meaning this computer, with a warning: Claude Code receives the sign-in there. Only connect if you started Claude Code yourself just now.
- After the confirmation, /mcp in the terminal shows SoPasst as connected.
Confirm the connection in SoPasst
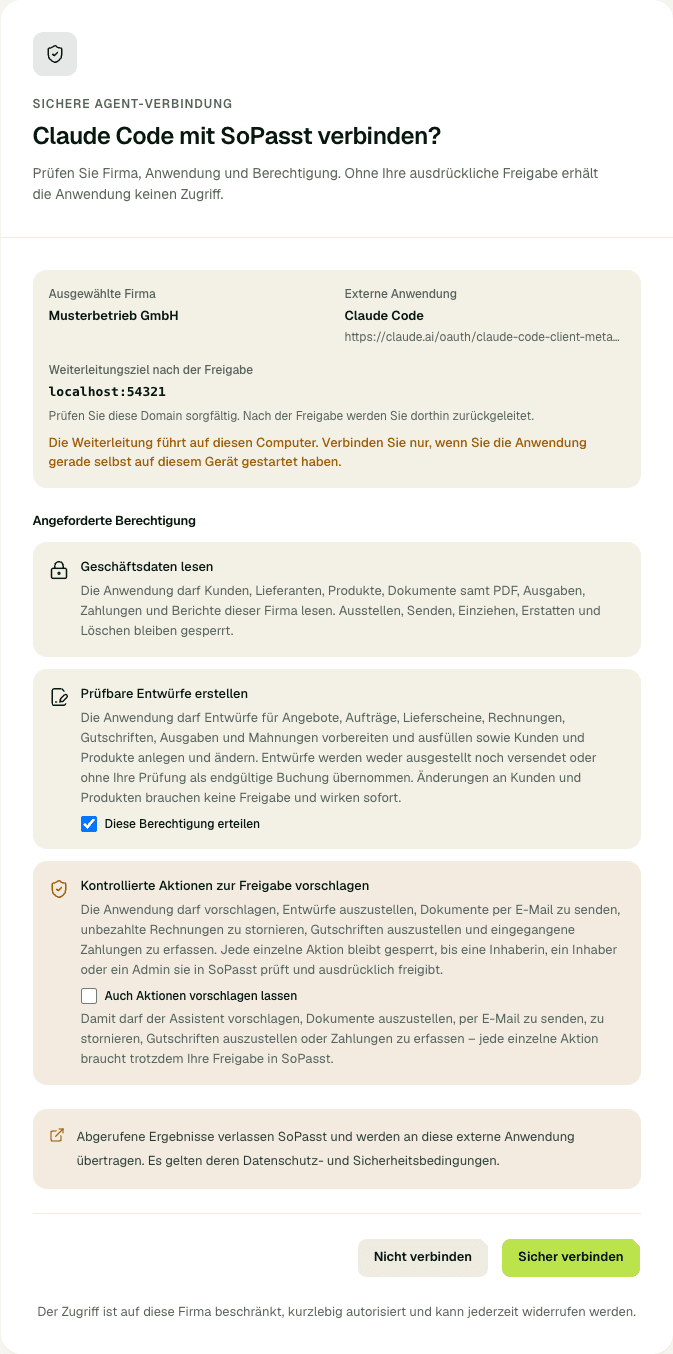
If SoPasst shows “Could not connect: agent access is switched off” instead of the confirmation page, choose “Enable agent access” there and start the connection in the assistant again. SoPasst admits only reviewed assistants; if SoPasst reports an invalid request, write to us via “Help” in the sidebar.
- Sign in if needed. Check “Selected company”: the connection applies to this company only. For another company, switch company first and start the connection again.
- Check “External application” and “Redirect destination after approval”, for example claude.ai or chatgpt.com.
- “Read business data” always applies; for “Create reviewable drafts”, “Grant this permission” is preselected. Tick “Also allow proposing actions” only if the assistant should propose issuing, sending, Storno, credit notes and payments.
- Choose “Connect securely”. With “Do not connect” you cancel and the assistant gets no access.
What the assistant may do
- Read: customers, suppliers, products, documents with their PDF, expenses, payments, open items and the income and expense summary (EÜR).
- Drafts: create and fill quotes, order confirmations, delivery notes, invoices and credit notes as drafts, plus expense and Mahnung drafts. A draft has no number yet. The assistant may create and change customers and products; that takes effect at once and needs no approval.
- Propose (only with “Also allow proposing actions”): issue a draft (documents.issue), e-mail an issued document (documents.deliver), cancel an unpaid invoice with a Storno (documents.cancel), issue a credit note (documents.correct) and record an incoming payment against an invoice (payments.record).
- Never: delete, change roles, settings or the plan, collect or refund money.
Important
Set limits
Before the assistant can propose anything, each of these actions needs a limit. Without one, the assistant declines and gives you the link to the “Agent action limits” page.
- Open Settings › Connect AI apps and choose “Manage action limits”.
- Every action has its own card: “Issue document”, “Send document” (e-mail), “Cancel document”, “Issue credit note” and “Record payment”. Check “Maximum per action”, “Maximum per day” and “Actions per day”. The fields are filled with suggestions; as long as the card shows “Not configured”, no limit applies yet. For sending only the count applies.
- Under “Permitted counterparties”, choose whether all active customers or only selected ones apply, and then “Save limit”.
Approve an action
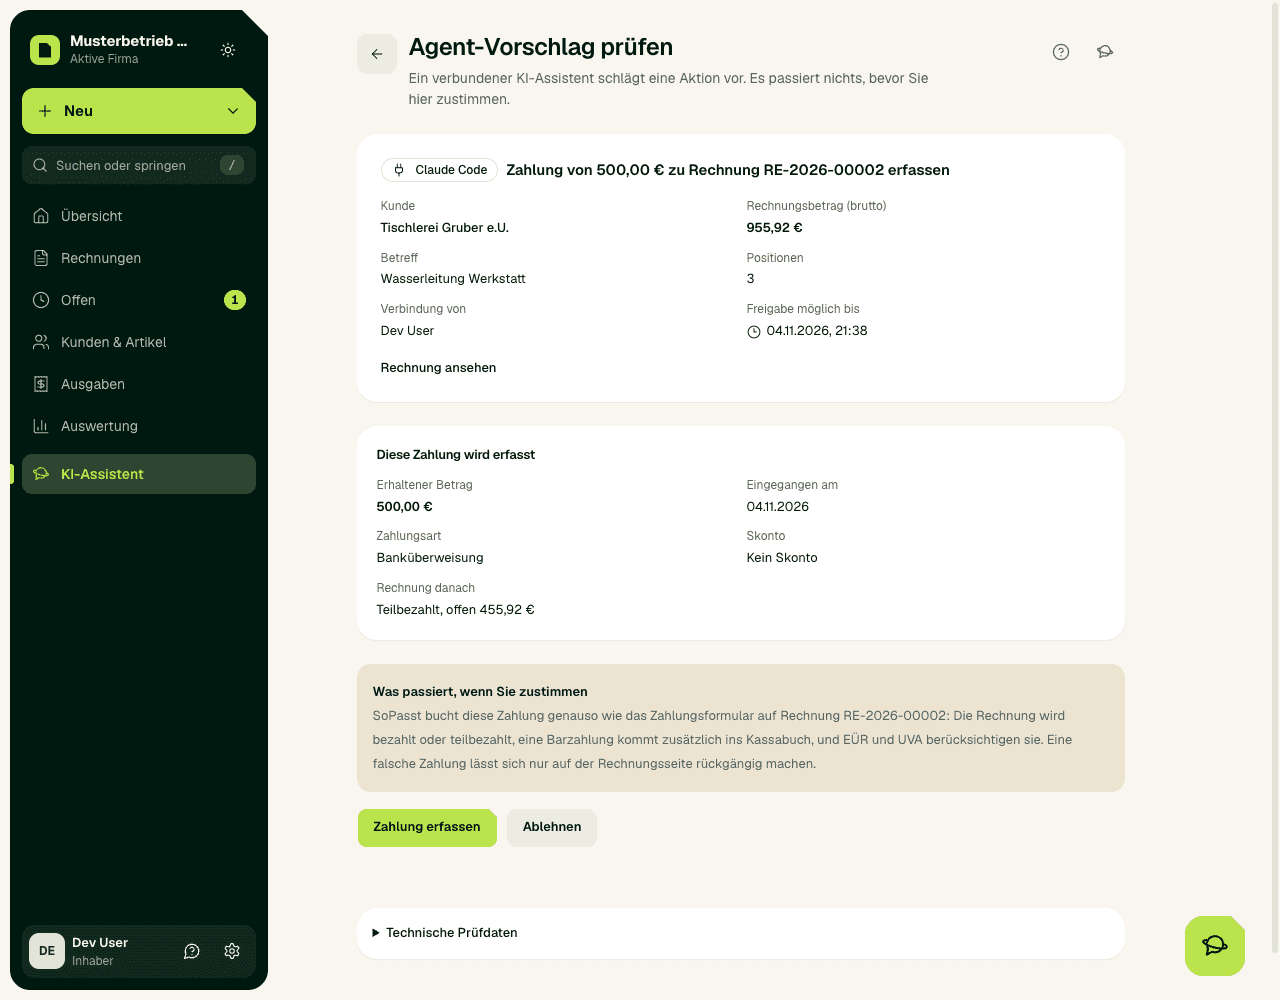
- The assistant gives you a link to the approval. You also find open proposals under AI assistant › Approve at “Review”.
- The page shows exactly what happens: customer, amount, line items, for e-mails recipient, subject, message and attachment, for payments amount, date received, payment method, Skonto and the invoice status afterwards.
- If your company has switched on “Approvals with a confirmation code”, enter the code from your authenticator app.
- Choose the action, for example “Issue Invoice” or “Record payment”, or “Reject”. A proposal is valid for 15 minutes; after that the assistant has to make it again.
Important
Approvals with a confirmation code
- First set up two-step sign-in under Settings › Security.
- Under Settings › Connect AI apps, at “Approvals with a confirmation code”, choose “Turn on”.
- From now on every approval needs the current 6-digit code. Turning it off needs a code too.
Disconnect
- Open Settings › Connect AI apps. Under “Connected applications” you see every connection with its permissions, date and last activity.
- Choose “Revoke access …” and confirm with “Revoke access”. The application loses all access at once; open proposals can no longer be carried out.
- To stop all assistants of your company at once, choose “Disable agent access”. The connections stay stored and work again as soon as you choose “Enable agent access”.
Expected result
The assistant shows SoPasst as connected, and Settings › Connect AI apps lists the application under “Connected applications” with its permissions. Every approved action is listed under AI assistant › History.
Privacy
What the assistant fetches leaves SoPasst and is processed by the assistant's provider, under that provider's terms. Only connect applications you trust with this data.